

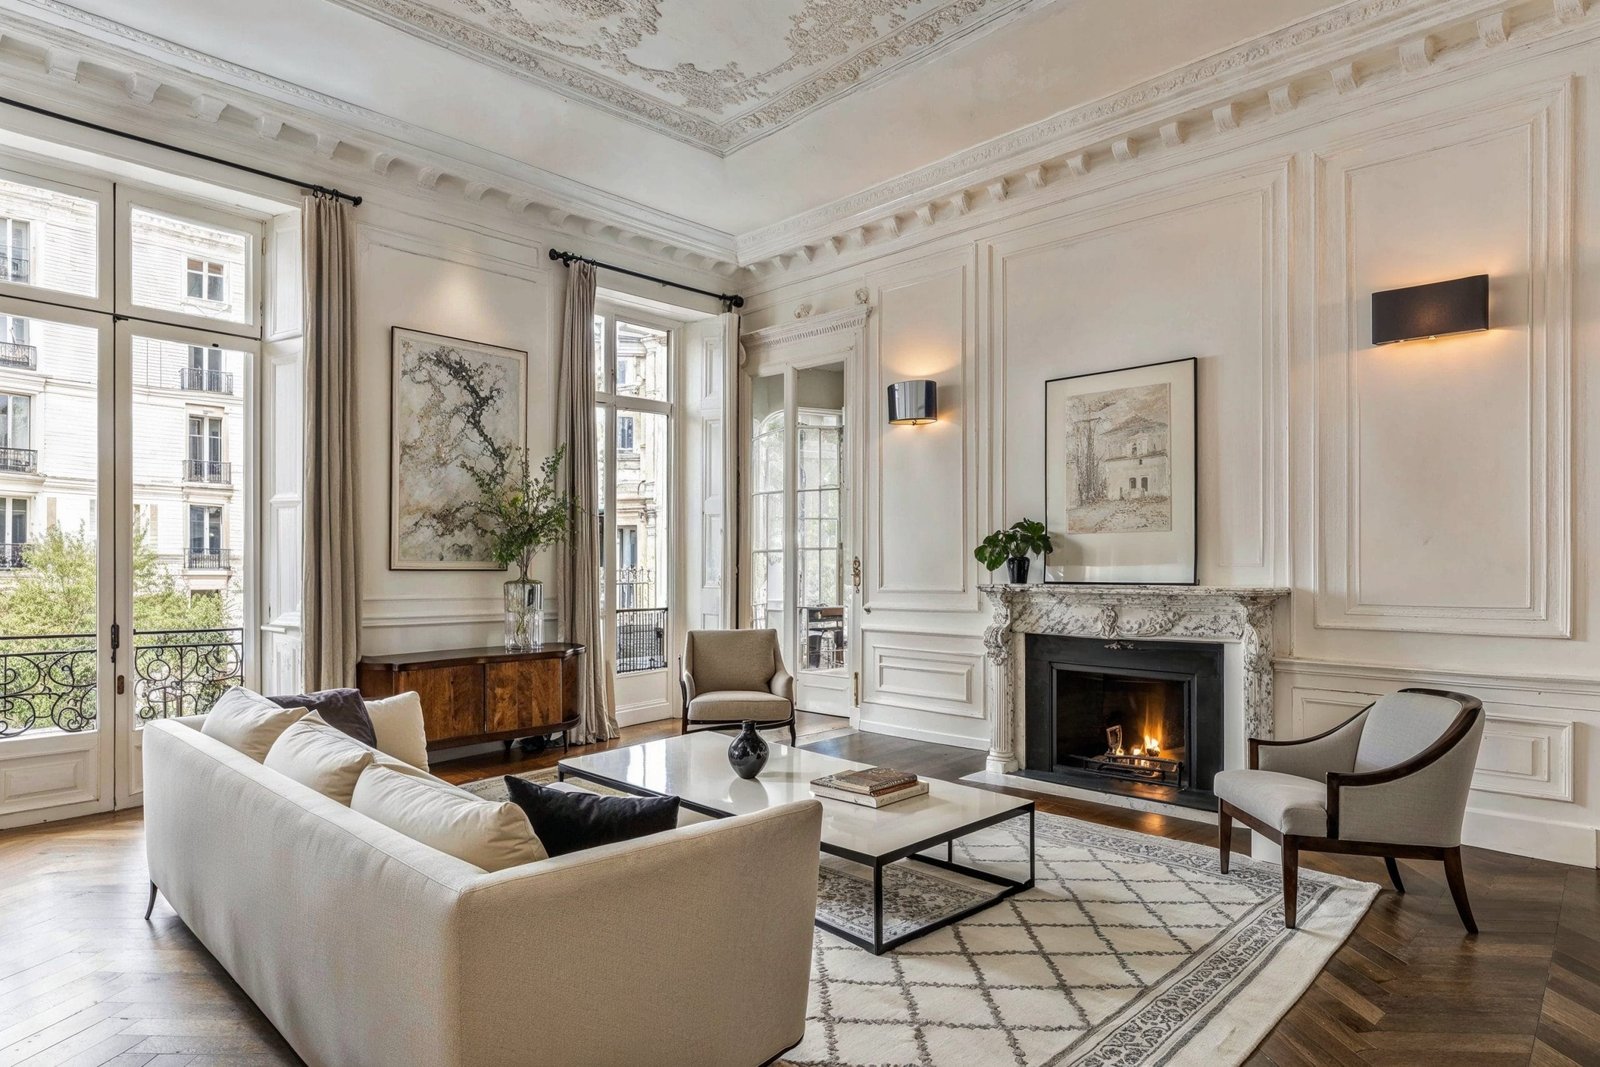
I remember standing in a friend’s newly renovated dining room a couple years back, trying to figure out why it looked so much more “finished” than mine. Same paint color, similar furniture, roughly the same square footage. It took me an embarrassingly long time to realize the difference was the wall — hers had this subtle grid of raised trim running across it, mine was just flat drywall. That’s molding doing its quiet work. It doesn’t shout for attention, but its absence is oddly noticeable once you know what to look for.
If you’ve been scrolling home renovation content lately, you’ve probably seen this trend everywhere — accent walls with picture-frame trim, board-and-batten hallways, wainscoting in powder rooms. It looks simple in photos. It is not always simple in practice. Let’s get into what this actually involves before you commit a weekend (and a chunk of your budget) to it.
Quick Answer
Decorative wall molding is trim — usually wood, MDF, or PVC — applied to a wall in patterns (grids, panels, arches, or borders) purely for visual effect, not structural support. It’s used to add depth, architectural character, and a custom-built feel to plain walls, and it’s popular in dining rooms, hallways, bedrooms, and accent walls. It’s a legitimate, widely-used design technique, not a gimmick, though the results depend heavily on installation quality and wall condition.
What Is Decorative Wall Molding, Exactly?
At its core, decorative wall molding is any strip of material attached to a wall to create a design pattern rather than to serve a structural purpose. This is different from baseboards or crown molding, which technically also decorate but primarily exist to cover transitions (floor-to-wall, wall-to-ceiling). Decorative molding is applied mid-wall, often in geometric shapes, to mimic the look of custom millwork, paneling, or old-world craftsmanship.
You’ll hear it called a few different names depending on the style:
- Picture frame molding — rectangular outlines that look like empty frames on the wall
- Board and batten — vertical boards with horizontal or vertical trim strips, often below chair-rail height
- Wainscoting — a broader term for decorative paneling on the lower portion of a wall
- Grid molding or wall trim panels — repeating rectangles across a large wall surface
- Applied molding — the general industry term for any trim added on top of an existing flat wall
None of these require tearing into your wall structurally. That’s actually one of the appealing parts — it’s a surface-level upgrade, not a renovation in the traditional sense.
How Does It Work?
The process is more straightforward than people expect, though “straightforward” doesn’t mean “fast.”
- Planning the layout. This is honestly the part people underestimate. You measure the wall, decide on the pattern (grid size, spacing, proportions), and mark it out — usually with a level, a pencil, and a lot of patience.
- Cutting the molding strips. Typically done with a miter saw for clean 45-degree corners, though butt joints work fine for simpler grid patterns.
- Attaching to the wall. Usually a combination of construction adhesive and a brad nailer, hitting the studs where possible for extra hold.
- Filling and caulking. Nail holes get filled with wood filler, and the edges get caulked so the trim looks seamless with the wall rather than like something stuck on top.
- Priming and painting. Almost always painted the same color as the wall (or occasionally a subtle contrast) so the shadow lines — not color contrast — create the visual interest.
That shadow-line effect is really the whole point. Good molding work relies on light hitting raised edges to create depth. A poorly lit room or oddly angled overhead lighting can actually undersell an otherwise nice installation, which is something a lot of tutorials don’t mention.
Main Features
- Material options: primed finger-jointed pine, MDF (most common for budget projects), solid hardwood, or PVC/composite for bathrooms and humid areas
- Pre-primed vs. raw wood: pre-primed saves a painting step and is worth the slightly higher cost for most DIYers
- Flexible molding: newer polymer-based flexible trims exist for curved walls or arches, which solid wood simply cannot do
- Peel-and-stick versions: lightweight foam or PVC molding with adhesive backing, marketed as renter-friendly, though durability is genuinely hit-or-miss
- Pattern versatility: works for full accent walls, single focal panels, ceiling borders, or even furniture and door fronts
Pros and Cons
Pros:
- Noticeably upgrades a room’s perceived value without structural work
- Relatively affordable compared to built-in cabinetry or custom millwork
- Wide range of styles, from traditional to modern minimalist grids
- Doesn’t require electrical or plumbing knowledge
- Can be done incrementally — one wall now, another room later
Cons:
- Time-consuming to measure and lay out correctly; mistakes are visible
- Dust from cutting and sanding, especially with MDF, which isn’t pleasant to breathe
- Removing it later can damage drywall and paint underneath
- Uneven or older walls make clean installation harder than tutorials suggest
- Adds a small amount of dust-catching surface area that needs occasional cleaning
I’ll be honest — the dust-catching part sounds trivial until you actually own it. Horizontal ledges on wainscoting collect a fine layer of dust faster than a flat wall ever would. It’s not a dealbreaker, just something nobody mentions in the glossy before-and-after photos.
Real-World Use Cases
A few scenarios where this tends to actually deliver on its promise:
- Rental-friendly accent walls: Using lightweight peel-and-stick molding in a bedroom to add texture without a full renovation commitment, then removing it (carefully) before moving out.
- Dining rooms: Picture-frame molding paired with a darker paint color below chair-rail height, which is probably the single most common application in home design content right now.
- Hallways and stairwells: Board and batten adds interest to otherwise narrow, purely functional spaces that don’t get much furniture or decor.
- Home offices: A single accent wall behind a desk for video calls — this has become common enough that it’s practically its own sub-trend.
- Older homes missing original trim: Sometimes molding is added to match or restore character that was stripped out during a mid-century renovation.
Each of these works because the wall itself is the focal point, not something competing with heavy furniture or busy wallpaper.
Safety, Legitimacy, and Practical Concerns
There’s no scam angle here — decorative wall molding is a legitimate, well-established design practice used by contractors and DIYers alike, not a fad product being oversold. That said, a few practical concerns are worth flagging:
- MDF dust contains fine particles that can irritate lungs during cutting; a mask and good ventilation matter more than people assume.
- Adhesives and paints should be low-VOC, especially in bedrooms or poorly ventilated spaces.
- Weight and mounting: heavier solid wood molding needs proper anchoring, not just adhesive, or it can eventually sag or pull away from the wall.
- Landlord approval: for renters, even “removable” molding can leave adhesive residue or nail holes — always confirm what’s actually allowed in the lease before starting.
- Moisture-prone rooms: standard MDF is a poor choice for bathrooms; PVC or moisture-resistant material is the safer call there.
None of this makes the technique risky in any serious sense — it’s more about doing it correctly than avoiding it altogether.
Common Problems and Limitations
The gap between Pinterest photos and real installs usually comes down to a handful of recurring issues:
- Walls that aren’t perfectly flat or square, which is most walls in older homes, throwing off measurements
- Inconsistent spacing when people eyeball a pattern instead of doing the math first
- Skipping caulk, which leaves visible gaps between the molding and the wall once paint goes on
- Underestimating paint coats — trim usually needs at least two coats to look crisp against the wall color
- Corner miters that don’t quite meet, especially for anyone using a miter saw for the first time
If you’re newer to DIY work, starting with a small single panel (like above a headboard) rather than an entire room is genuinely the smarter move. It’s much easier to fix mistakes on one 4-foot section than an entire hallway.
How It Compares to Alternatives
| Option | Cost | Effort | Permanence | Visual Impact |
| Decorative wall molding | Low–moderate | Moderate–high | Semi-permanent | High |
| Wallpaper | Low–moderate | Low–moderate | Removable (varies) | Moderate–high |
| Textured paint | Low | Low | Permanent (repaintable) | Low–moderate |
| Custom built-in millwork | High | Professional install | Permanent | Very high |
| Peel-and-stick 3D panels | Low | Low | Removable | Moderate |
Molding tends to sit in a sweet spot — more visually convincing than wallpaper’s flat pattern, but far cheaper and less invasive than hiring a carpenter for built-ins. Wallpaper is faster if you want pattern and color without the physical build. Textured paint is the lowest-effort option but also the least dramatic transformation.
An Honest, Practical Opinion
Having watched a few of these projects unfold in person (including one that took a friend three attempts to get the spacing right), my honest take is this: decorative wall molding earns its popularity, but the tutorials undersell the planning phase. The actual attaching and painting isn’t the hard part — laying out a pattern that looks intentional and symmetrical is. If you’re the type who double-checks measurements twice before cutting, you’ll probably enjoy this project. If you tend to eyeball things and hope for the best, expect a visible seam or an off-center panel somewhere.
It’s also worth saying plainly: this isn’t a project that transforms a room on its own. A wall with beautiful molding and bad lighting, cluttered furniture, or a clashing paint color still won’t look “finished.” Molding enhances a space that’s already reasonably put together — it’s not a fix for a room that has bigger design problems.
Final Verdict
Decorative wall molding is a legitimate, cost-effective way to add architectural interest to a plain wall, and it holds up well against alternatives when you want a custom, built-in look without a full renovation budget. It’s genuinely useful for accent walls, dining rooms, hallways, and rental-friendly makeovers, provided you’re realistic about the time investment and precise about measuring. It’s not risky or gimmicky — the real limitation is patience and attention to detail, not the technique itself.
Find More In-Depth Guides on: Sharemyideaz
FAQs
Q: Is decorative wall molding expensive to install?
A: Not typically. A single accent wall using MDF or pine molding can often be done for well under $200 in materials, though solid hardwood or professional installation raises the cost significantly.
Q: Can I install decorative wall molding myself without experience?
A: Yes, for simpler patterns like a single picture-frame panel or basic grid. More intricate designs with angled cuts benefit from some prior experience with a miter saw.
Q: Does decorative wall molding damage the wall underneath?
A: It can leave nail holes and adhesive marks when removed, which is a real consideration for renters. Peel-and-stick lightweight options are generally gentler on walls than nailed wood trim.
Q: What’s the best material for a bathroom or humid room?
A: PVC or moisture-resistant composite molding holds up better than standard MDF, which can swell or warp with prolonged humidity exposure.
Q: Does decorative wall molding increase home value?
A: It can improve perceived value and buyer appeal in listing photos, particularly in dining rooms and entryways, though it’s a cosmetic upgrade rather than one that shows up directly in appraisal value.
Q: How long does it take to install molding on one wall?
A: For a single wall with a moderate grid pattern, expect one full weekend when you factor in layout, cutting, installing, filling, caulking, and painting with drying time between coats.
